After two years of being mostly inside, I developed an increasing desire to travel. I’m also a millennial developer in the age of social media, so I felt like I needed a way to share where I was going. In this post, I will show how I built a personal photo blog. My tools of choice: Sanity and Eleventy.
Disclaimer: I recently started working at Sanity, so I am biased. Of course, other authoring tools and content platforms exist too; use what works for you etc.
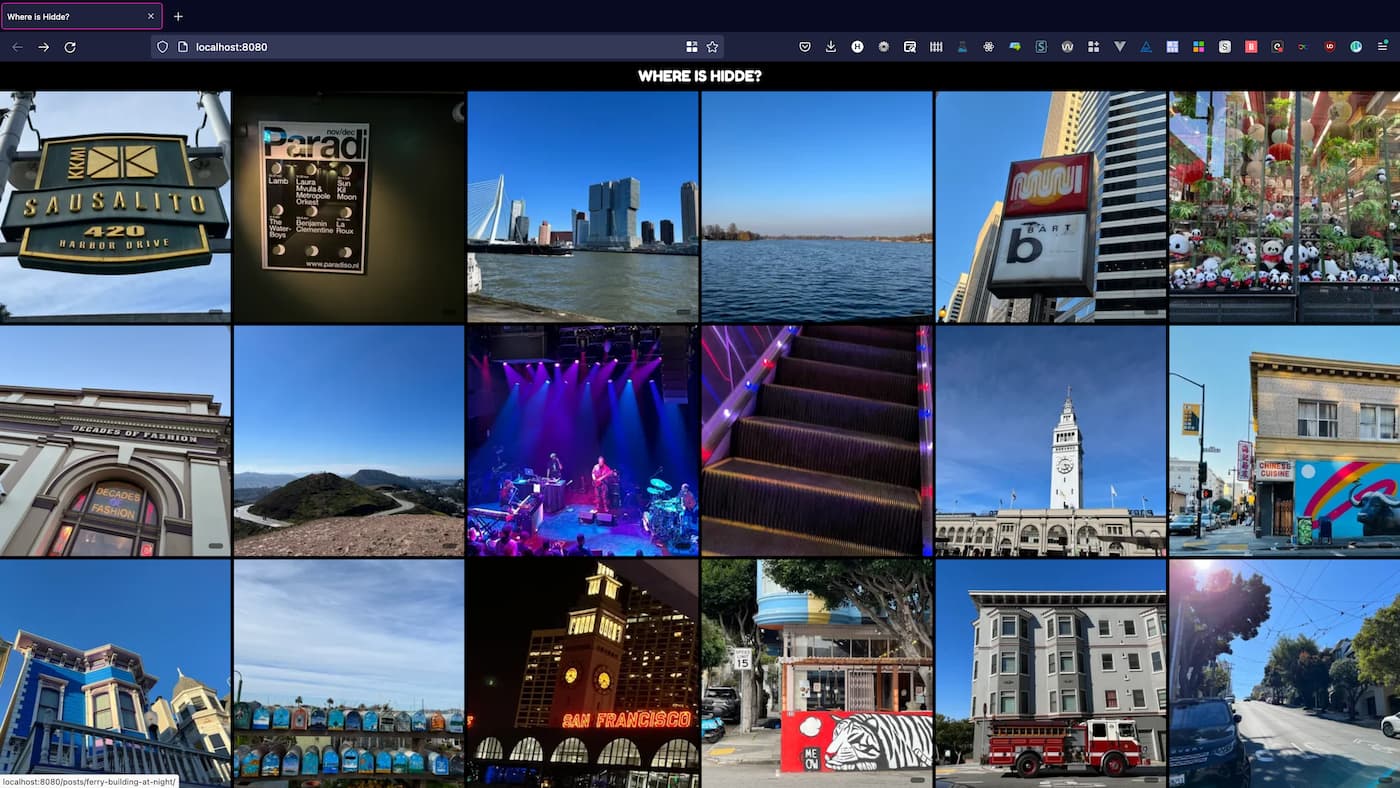 where.hiddedevries.nl
A wishlist
There are a lot of ways to share photos online, but what would I do if the proverbial sky was the limit? Here’s some things I wanted for my photo blog.
Control
Something I find particularly important on websites, especially when they have my personal content, is that I have control. Control over where the content would live was important, I wanted to be able to move my stuff to elsewhere. I wanted to decide what URLs looked like. I also wanted control over how my content was presented.
Works from a phone
Travel updates are particularly place and time specific. I usually find time to write updates while I’m still traveling, so the ability to compose on the go would be a must have. This could have different shapes and forms. The photo-taking would always be on the go, of course, phones and cameras are very portable. But I also wanted to publish photo content from a mobile device. In my case that meant not using git for content, but a CMS (!).
Can put location data to use
These days, most (phone) cameras can save location data into the image file: latitude, longitude and level. This is fairly privacy sensitive, so I would not always want to share it. On a photo blog though, for photos I picked, it seemed like a useful thing to add, especially since this would be data under my control.
Is a product instead of me
I didn’t want to be the product, I wanted to pay for storing my content, or at least store my data in a place that charges customers for storage.
Lives on a URL I control
To decrease reliance on specific systems, I desired to set this personal archive up with URLs that I control. This makes it possible for me to move my data to a different URL, without breaking The Web.
Has simple syndication
To ensure that people have an easy way to find new content, I also wanted to implement RSS, or Really Simply Syndication. It points RSS readers to my content, so that they can show it in their timeline.
Building blocks
Ok, so with that wishlist in mind, I started out building myself a photoblog using Sanity, Eleventy and Netlify. Except for Eleventy, these are commercial tools, but they have free tier quota that a personal photo blog will be unlikely to exceed. In any case, they meet the “I’m not the product” item on the wishlist.
Sanity
Let’s start with the Sanity part. As mentioned, I recently joined the Sanity team, and this project is my first deep dive into the product. Or products, really.
Sanity has multiple products that together form an ecosystem that can power your content creation and delivery process.
The first is an authoring tool, called Sanity Studio, that presents a UI that mirrors your content structure. If you have a recipe website, it can have fields for “ingredients”, “method” and “vegan-friendly”, if you are a concert venue, you may want fields for artists, genres and photography. You can have fields that are strings of text, dates or images, to name a few.
There is also a place to store content, called Content Lake, to which you can send data, using the Studio or using anything else that can do HTTP, like curl. This is where content is saved in the structure you define, and without storing any HTML. The Studio saves your stuff in real time, which also comes in handy if you work on content with multiple people simultaneously.
And then there is a query language called GROQ, that you can use to request precisely the content you need in your website (or any JSON file, also outside Sanity). It’s a little bit like GraphQL, for those familiar with that, Sanity supports that too (yay choice!). In my case, if I wanted to query photos, I could ask for them all, or request photos taken in a specific location or with a specific aspect ratio. I can then specify which data I want from that selection, such as the description or alternative text.
So, Sanity has a set of tools that each deal with a specific part of your content processes, covering the creation, storing and fetching of content. What it doesn’t offer is a front-end, this is by design.
Eleventy
For building front-end projects, I’m a huge fan of Eleventy, a Node tool that can create static websites. I love it for being unassuming and unopiniated. It is great for progressive enhancement, too, as it doesn’t ship with JavaScript in the runtime if you don’t ask it to. You feed it data, write templates and it will create HTML for you that you can host somewhere.
Eleventy makes it easy to set up an RSS feed with the RSS plugin, set up URLs however you like and output HTML that you have full control over, so that’s a few of my wishlist boxes checked.
Netlify
Which brings me to hosting. When Eleventy has built a folder of static HTML files and assets, we’ll need to put that folder somewhere to see it on the web. We’ll use Netlify for that, as it can conveniently integrate with GitHub as well as Sanity, i.e. do its thing when there are changes in code or content.
Process
With those tools, I built my personal photoblog. Below, I will go into some of the stages I went through from start to finish. I used a starter project, defined a content structure, ensured I could add photos, wrote a query to fetch my data, built a front-end to display that data and then set up automated deployments.
Starter projects
I got started using the Sanity / Eleventy starter project. These starter projects ‘magically’ set up everything you need for a Sanity project: the authoring tool, the data storage, a GitHub repo and some minimal starter code that shows how to query and then use the data you get returned. The starter project tool sets all this up for you and does the necessary plumbing to leave you with working development and production environments.
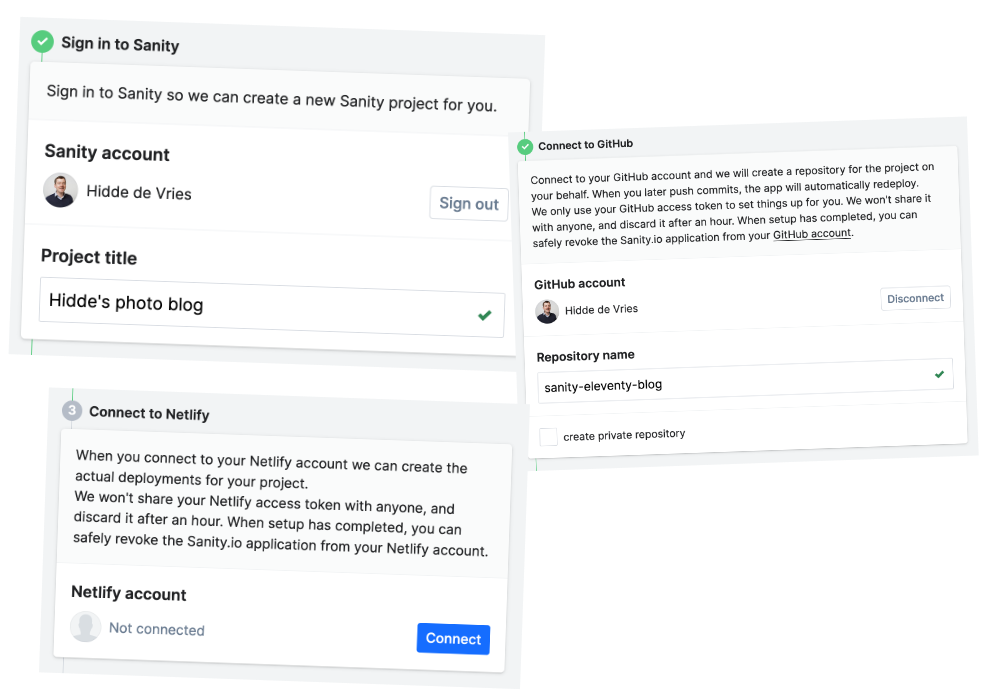 The three steps of this starter: connect Sanity, connect to GitHub and connect to Netlify. With these permissions, the starter script sets things up on behalf of you.
Magic and code, not everyone loves it. I might opt to set up each part manually, but it was nice to see the steps in action and have a working environment in minutes.
Content structure
With the setup out of the way, my next task was to figure out how to structure my content. After trying some different structures and ideas, I ended up with just two content types, Photo and Category. For categories, I wanted to save a name. For photos, I wanted to save an image including colour and location data, a text alternative, a title, a date and a Category.
In Sanity, content structure is defined in code, this is part of what my main image type lools like:
{
  name: 'mainImage',
  type: 'image',
  title: 'Image',
  options: {
    hotspot: true,
    metadata: [
      'location',
      'palette'
    ]
  },
  fields: [
    {
      name: 'alt',
      type: 'string',
      title: 'Alternative text',
      description: 'What\'s on this picture?',
      validation: Rule => Rule.error('You forgot to describe this image').required(),
      options: {
        isHighlighted: true
      }
    },
  ],
It has an image field with “hot spot”, so authors can say which part of the photo should be prioritised in case of cropping and it has a compulsory field for alternative text.
For images, Sanity strips out most metadata by default. In my case, I actually wanted to share location data, so I turned that on manually, adding location to the content structure. I also opted for Sanity to extract colours from uploaded images using the opt-in palette feature. For more information, see Sanity’s Image Metadata documentation.
Adding photos
The authoring tool is in your repo, too. You can run it on a local server, host it with Sanity or host it with any web hosting. It is “just” a Single Page App that does HTTP requests.
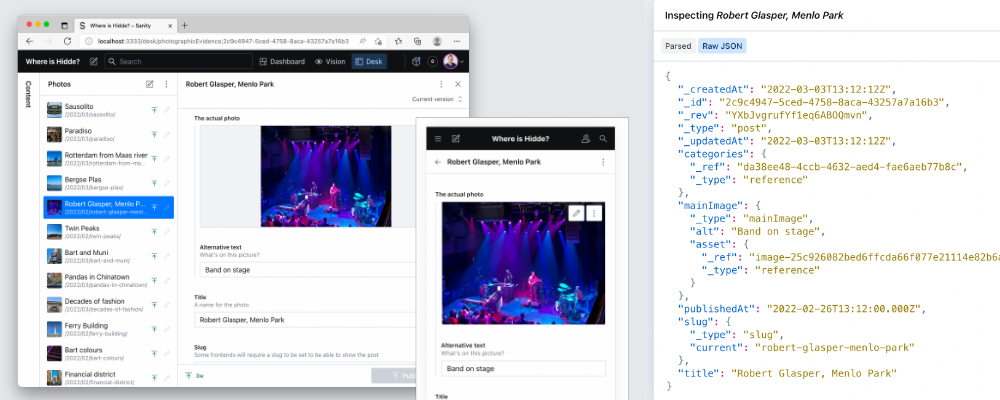 Editing a post on desktop and mobile
In my case, my wishlist said I wanted to do some of this on my phone, so I deployed my Sanity Studio on a URL, in my case on Netlify. I say “I deployed”, but the first Netlify deployment of my Studio was actually set up by the starter project. The Studio works on phones, because it has a responsive UI and not a lot of fluff that requires screen real estate. Sanity’s image upload component is a regular file upload, that, on my phone, was able to take input from my photo library as well as from the camera directly.
A common, Jamstacky way to host a blog or photo content would be to put the content in a git repository, probably using some combination of Markdown for content and Yaml for metadata. I do that for my Books, and it works ok for me. But for editing on the go, it is actually nice to have a CMS, not content in git. It saves from the trouble of finding a way to run or trigger add, commit and push commands from my cli-less mobile OS.
Data collection
As mentioned earlier, Sanity supports this query language called GROQ. There is a CSS-Tricks post on how to use GROQ on your data, but I’ll go through my query for content too.
GROQ queries can have these three parts:
- the dataset with all your documents
- a filter (which subset of documents you want)
- a projection (the shape of the data from that subset)
Let’s look at an example that combines the first two parts. First, it requests all content in my dataset (*) , then it filters for data of the “post” type that has a slug and has a “published” date before now (so anything that’s not set to be published in the future):
*[_type == "post" && defined(slug) && publishedAt < now()]Then, from that data, we can define a specific set that we need for the photo blog:
{
  _id,
  publishedAt,
  title,
  slug,
  mainImage {
    ...,
    asset->
  }
}
This requests an object of a specific shape for each post that is returned. The _id is an internal property, publishedAt and title are the publish date and a title, the slug is a URL friendly string and mainImage has a pointer to where the image lives.
From the mainImage, we’re specifically requesting two things with the projection ({}):
- First, we “spread” all the properties of the
mainImageobject with..., a bit like the spread syntax in JavaScript. - Then, we also join in the reference found in
asset->.
The thing is, my posts don’t contain the image data, they contain references to the image data. So if I had asked for asset, I would only get access to an ID that I could use to find the referenced asset. The good news is that I don’t actually need to find it myself, as with asset->, we’re getting the data of the referenced asset and use it right there. In other words, the properties that the image asset object had are returned in place.
A “reference” is an indexed pointer to another document that you can query. In this case, the relationship is between a post and an image. This works two ways. If you’re listing images, for each image, you can request the post it relates to. If you’re listing posts, you can request the image that it relates to.
Front-end
For the front-end, I’ve gone with a page that lists all photos and a simple header and footer. There are also individual pages for each photo.
Image URL fun
Sanity has a lot of features that you can access by manipulating your image’s URL. If you know the image URL, you can add parameters to request:
- specific crops; I use this for square images on my index page
- formats; I use “auto formats” so that the CDN returns webp’s to browsers that support them, yay performance
- manipulated versions of your images, eg with different resolutions and sharpnesses
Photo-based header colours
On the single photo page, the background of the header has the colour of the most prominent colour in the photo. I was able to build this, because Sanity can return a palette object with a bunch of colour info, including the most prominent and a color that contrasts with it. In my template, I use the HEX value from this palette property to overwrite the CSS variable that the header’s color and background-color are set with.
In the (Nunjucks) template for a single photo, I have this HTML snippet:
<style>
body {
  --header-background-color: ;
  --header-color: ;
}
</style>
For the header colour, my site’s main stylesheet has a custom property, as CSS’s built-in variables are called. With this snippet, I overwrite it. Custom properties in CSS take part in the cascade, CSS’s system to figure out which style to use when style rules compete. In this case, the definition in my main stylesheet and the one in this template compete, and the latter wins.
Blurry previews
Photos can take time to load, so I pondered displaying something while you’re waiting. I’ve never been a fan of spinners, or, unpopular opinion, skeletons, but I found Sanity can return a ‘blurhash’. This is a string that looks like this:
d79Z$I-o4:IoxaofR*WC00Io?GxtM{Rkt7s:~VxaNGRkIt can be converted into a very blurry and small image that is specifically useful to show while waiting for the full image. This is mostly useful for users on slower connections. I have left this out from the final site.
Deployment
Own URL
My personal site is hiddedevries.nl and I want to use where.hiddedevries.nl for this project. I set up my nameservers so that they point to Netlify, where I’m hosting the website. The site now mostly meets the “own your URL” requirement, and if I get unhappy with my current setup, I can move my data elsewhere.
One aspect where I don’t own my URLs though, is image assets. When I requested images with GROQ earlier, I got a URL of Sanity’s CDN. This has end user benefits, including that it can serve assets from the data centre that is closest to you, caching and, less of an issue with HTTP/2, allows for more more concurrent downloads by having a separate hostname. For full control and with the same benefits, you might want this on your own separate hostname too. I’m told this is currently only possible in Sanity’s enterprise plan. If it’s your thing, you could totally build some sort of proxy yourself, too.
Hooks
Our generated files from Eleventy are on Netlify and need to be deployed to Netlify. When is a good time? Probably when either the code, on GitHub, or the content, in Sanity, change. We can keep Netlify posted of changes in either using webhooks:
- GitHub can tell Netlify about changes, these are set in the Netlify settings
- Sanity has GROQ-powered webhooks: given a GROQ query on your content, whenever the queried set of data changes, it can perform a HTTP request to a URL (and yes, that can be a Netlify build hook’s URL)
Whenever either of these happen, Netlify will run my build process. The build process comes down to:
- it grabs my latest data from Sanity (the response to my GROQ query, including photo URLs, metadata like titles, text alternatives, location and colour palette)
- it runs Eleventy to combine the data with my photoblog HTML/CSS
- it places the folder that Eleventy outputs on the server
Wrapping up
In this post, I’ve shown how I built a personal photo blog, managing content with Sanity, generating a static site with Eleventy and hosting that site on Netlify. That’s a lot of concerns, but I feel like they are separated in a sensible way, where each piece could be replaced by some other piece if needed.
I didn’t manage to check all of the boxes: uploading photos with location data in iOS and Android seems to be impossible, they are stripped upon uploading, probably for privacy (may be continued in another blog post). To have fun with location data, I will have to upload photos from desktop.
This was a fun learning experience, thanks for reading it, I hope it was helpful! You can look at the website at where.hiddedevries.nl. The code is on hidde/where-is-hidde, the schema for a post is in post.js.
Comments, likes & shares (4)
Sarah L. Fossheim :they_them: and Phil Hawksworth liked this
@hdv is it just the location data that got stripped? So far I had settled on giving countries, cities, and landmarks their own document type anyway, so I can add text and other info on the location level too eventually 😄
Last year, I started a photography hobby. Soon after, I've created a place where I can share some of my work, without any attention-driven algorithms dictating the terms. Here's a technical write-up of my journey.
Table of contents
Motivation
Why should one build a photography website in the first place?
Similar to this blog, I want to reduce my dependency on social media and third-party services. Even if I ignored Instagram's privacy issues and dark patterns, the fact they can delete my account at a whim is unacceptable. In fact, they shadow-banned my first Instagram account because of "suspicious activity". Pixelfed, a federated photo sharing platform, solves many issues of Big Tech. However, I can't guarantee the instance I chose to stand the test of time. Glass has potential, but there are some issues like no way to provide an image alt description. Refrakt is another photographer-centric platform, but I haven't tried it out, yet.
Instead of relying on third-party providers alone, I practice POSSE: I publish photos on my own site and syndicate them to my Pixelfed, Glass and Instagram accounts. This approach brings some further advantages:
Inspiration
Most photography websites are from professional artists who provide a showcase for potential clients. I was looking for a more personal look and feel. Fortunately, some fellow software developers share a photography hobby: Nicolas Hoizey (my favorite site!), Moritz Petersen, Artem Sapegin, Florian Ziegler, Evan Sheehan, Greg Morris, Alan W. Smith, Hidde de Vries (write-up), Shom Bandopadhaya, Jens Comiotto-Mayer, Matthew Howell, Paul Stamatiou, Jesper Reiche, Jamie Dumont, Chuq von Rospach and Matze. All those websites helped me narrow down the features I want for my own portfolio website.
Design
As mentioned, I don't want to convey a business feeling. I want a personal website that sparks joy. I've decided to go for a pinboard design:
Previously, I've rotated the photos randomly on every build for some chaos. I loved the effect, but the rotation required the pictures to be interpolated, making them slightly blurry.
I'm sure this design will change over time — check photos.darekkay.com for the current state.
Implementation
Let's get a glimpse into the technical side.
Content management
Similar to this blog, I went with the Eleventy static site generator.
I've decided to index my photos, starting at
0001. For each photograph that I publish, there are five files:The
In the beginning, I was using a single11ydata.jsonfile contains the photo metadata. The Markdown file contains the actual content: title, alt description, location, publish date and a short text. Thesmall.webpandmedium.jpgimages are used for the gallery and the photo page respectively.photos.jsonto store both the metadata and content. Using Eleventy pagination, I didn't have to create dedicated markdown files. As I've started adding short descriptions to my photos, this workflow was no longer viable. But it's still a good alternative for basic photo galleries. Make sure to also check Evan's approach to use the image files as Eleventy templates.I store the
mediumandsmallimages as part of the project's Git directory. Git isn't the best choice for storing binary files, but it doesn't cause any bottleneck, yet. Each photo pair is on average 350 kB big. I could use Git LFS, but it's not worth the effort for now.Loading performance
I've put much thought into the loading behavior to ensure a good user experience even on slow networks. I also wanted to avoid pagination and infinite scroll for the image gallery.
First, every image provides its width and height to prevent layout shifts.
Second, I use lazy loading, a performance strategy to load resources (like images) only when needed. Fortunately, most browsers support native lazy loading for images:
Third, the gallery serves WebP images at 75% quality. This saves around 50% of space compared to the original 85% JPEG file. I accept the quality loss for the gallery, but I still use full quality JPEG files on the individual photo pages.
The last technique is to provide a good fallback while images are still being loaded. I provide two fallbacks:
While the JavaScript BlurHash script (1.6 kB) is loaded, we see a fixed background color:
After the script has been loaded, the BlurHash placeholder is applied:
Finally, we see the actual image:
Not everyone has JavaScript, despite many developers ignoring this fact. The nice thing about BlurHash is that it's progressively enhanced: without JavaScript, only the fixed-color fallback will be displayed.
If you like BlurHash, check out ThumbHash, which returns more detailed placeholders.How do we test the loading behavior? Browser network simulations are useful, but not so much for local images, as they'll still load almost instantly. Instead, I've created custom Eleventy middleware to delay image loading artificially during testing.
Navigation
On each page, I've placed a link to the "previous" and "next" photo. I've implemented this using a custom Eleventy collection:
I can then access the page URLs in my layout file:
RSS
I consider RSS a must for any blog-like website. A photo gallery is no different. Here's my RSS feed. The RSS feed contains the entire post content and the small image preview. I've also styled the RSS feed, so it matches the website design.
Pixelfed, Glass, Flickr and Pinterest also provide RSS feeds.Accessibility
I care a lot about web accessibility. I've tried my best to make sure anyone can use my website, including people with impairments or disabilities.
An important part is to provide descriptions for every image via an
altattribute. As long as there's no AI to translate a picture and its essence into words (and I don't think we'll get there anytime soon), artists have to handle this themselves. I try to describe what a photo contains, but also the feeling it conveys. This has a great side effect, as it lets me think more about my photos. I must admit, I struggle with this as much as I do with photo titles, but I think this will become easier with more experience.Apart from that, I've followed the usual path:
Pipeline
Here's my workflow pipeline for publishing a new photo, using
05.jpgas an example file:Most of those steps are automated.
Preparation
In the first step, I strip irrelevant photo metadata using ExifTool. I leave all the data that other photographers might be interested in, e.g., aperture, exposure and ISO:
Next, I use ImageMagick to create two files: a small thumbnail and a medium-size photo:
The entire pre-processing takes one click using XYplorer, my indispensable Windows file manager.
Metadata update
The next workflow step creates an
11tydata.jsonfile, which contains relevant Exif data and the blurhash.I use
exiftoolandjqto create a temporaryexif.jsonfile containing the Exif metadata from all photos:To calculate the blurhash, I use
blurhashandsharp:Both results are then normalized and piped into an
With Eleventy 2.0, it's possible to feed Exif image data into the data cascade. This approach eliminates the metadata synchronization step at the cost of having to parse all photos on every build.11tydata.jsonfile.Content update
Finally, I need to handle the content. A script creates a template Markdown file that I then edit manually. While I don't always come up with an image title or description, I'll always provide an alternative text, as explained in the accessibility section. I include the photo location only if it's relevant.
Further steps
I'm happy to have a place to share my photos that I have full control over. It's also a nice way to see my progress as a photographer. While there are photography areas that I like more than others, I probably won't settle on a certain niche. I might introduce browsable categories someday if the number of photos becomes too overwhelming. I might also introduce filtering photos by camera or lens.
Check out my photos at photos.darekkay.com.